Countdown to P-Day

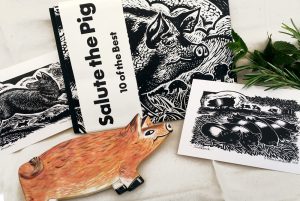
It’s only a few days now before the Autumn Country Market At Easton this Sunday, where we will be showing our completed “Salute the Pig” book.
I have spent the last few months getting just 10 of the 25 books bound, prints made, some accompanying ceramics prepared and all the bits of faffing around that go along with having a stall.
It has been very, very time consuming.. But we will be ready for Sunday!!!

The Books:
I am not a bookbinder as such, so the most nerve racking aspect of all this has been trying to bind the main letterpress printed books.  There are only so many beautifully printed sheets to work with, and I cannot afford to make any serious mistakes.

Covers and endpapers were handprinted. Books sewn and glued then all assembled and the original lino print plates tipped in and stamped. Phew..It’s adhering the endpapers to the covers that I have found most difficult… but it is good to try and get things right. All I can say is, I have made them the very best I can at this stage of my bookbinding ability!

Chris’s accompanying recipe booklet was digitally printed and so we designed it in InDesign echoing the type style of the main book. I converted my piggy sketches to monchrome red and dropped them into the text. The books are finished with a binding of … what else but… stripy butcher’s string!
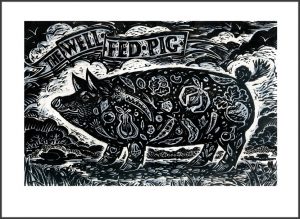


The Well Fed Pig:

We are selling a few prints from the book seperately and I worked on a large two colour combined lino/woodcut of the Well Fed Pig. I had already explored this theme of the pig tattooed with its favourite food in some earlier experimental ceramics and it has developed nicely into the print. The original image is A3 and I am selling these, plus a smaller digital A3 version.

Three Little Pigs 

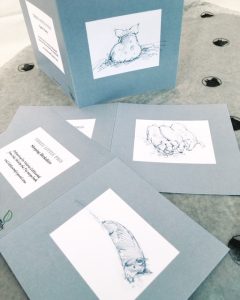
I liked some of the sketches from the recipe book so much that I decided to have some cards printed of the piglets. More may follow!


The Ceramics

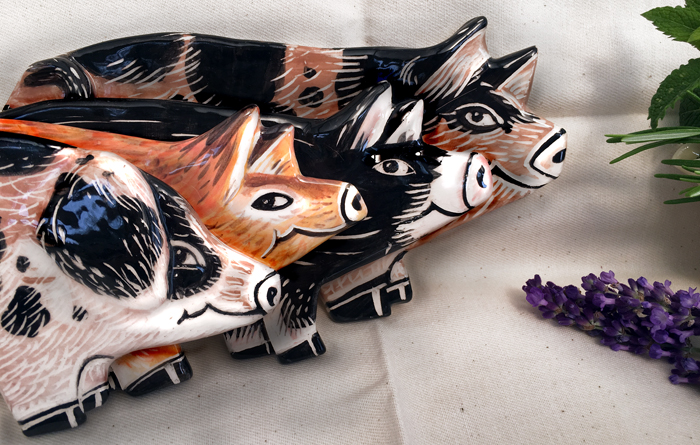
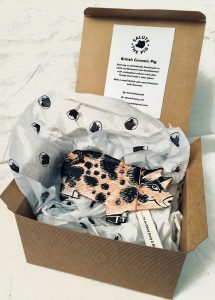
I like to make ceramics occasionally but I could never say I am a ceramicist. However over the last year I have played with some ideas which I thought might work for the pigs.  My ceramics are a bit like my bookbinding.. rather experimental, so sometimes ideas worked, but very often not, due to my own inexperience and/or firing issues, which rather dampened my initial enthusiasm.
But eventually I have enough good ones to be able to add them to the Pig Box and offer a small number for sale….and for me to consider continuing….many thanks to Gay and Julie for dragging me out of the slough of despond!


I am making a page on the blog about this project… I wonder if it will ever be finished 🙂

Half the Hog: Part 2

Printing the Texts:
With the texts set, checked and the few changes made it was onto the press with them, locked up, positioned and ready to go.
Most of the pages have to be printed on both sides so it’s essential to have the dummy book to work from to make sure the pagination is right for the book.
Because of the thickness of the paper I decided to have three folded sections, rather than just two, so that the book sits nicely in its binding and does not gape open.

IMG_2181
The dummy pages pasted up with markupsfor positioning the text block on the press bed.

The paper grain is also essential to ascertain as the grain must run in the direction of the spine, again so that the book pages lie flat and fold much more easily. Both papers are Zerkall which print beautifully and complement each other very well.Another consideration when cutting the paper was the question of the deckles. To keep or not to keep.
We wanted to keep them, again as an addition to the whole tactile feel of the book. The cutting meant that some pages would have deckles and some not. Again, just part of the look of a special little book made with great care, by hand and with beautiful papers.

IMG_2167
Adjusting the packing on the press

Because the type block consists of a light fine type and a heavier type the pressure on the packing was adjusted to allow more pressure for the large titles and less for the lighter text. The titles are set in a gorgeous original 1927 Futura. The big letters have the odd little chip here and there which just add to the character of the printing and the book.

IMG_2220
The ‘Welsh’ text about to come off the press.

A day for the first sides to dry and then Thursday was finishing up the main texts.

IMG_2188

Not a mistake but deliberate overprinting  to check for correct and consistent positioning of each consecutive textspot on!

IMG_2187

Piles of printed texts with the trial page

IMG_2211

Dry texts in neat labelled piles.

Friday was our final day to print the title page, copyright  and some extra images on larger sheets.

IMG_2225IMG_2229

Chris printed the last few prints. This is his favourite, the Berkshire!
Behind him the other prints hanging up to dry.

IMG_2164

And of course after each day the wash up. A strangely enjoyable task which marks an end to a good days work, the Vandercook clean and ordered and ready for the next task.
We came home with beautifully wrapped ( by Thomas) brown paper packets.
All I have to do now is design and print endpapers, design covers. collate, stitch, bind and tip in the plates ! Phew….. way to go Val….

Half the Hog in Amsterdam: Part 1

Last week we were in Amsterdam to print the Pig Book, “Salute the Pig”. Its been a couple of years in the thinking stage, so it was very nice to see it at last become an almost reality.

I say almost because I now have to design end papers and cover and then bind them, but they are looking splendid. We had booked a week with the excellent  Thomas Gravemaker at LetterpressAmsterdam. 5 days is a very short time to print even this small book and if Thomas had not done the typesetting we probably wouldn’t have made it.

IMG_2170
4 of the texts tied up on the galley.

While Thomas was finishing the texts, I started printing the images from the mounted lino blocks. A little bit of extra shim was needed to get the block to just type high but they printed pretty well!

IMG_2118

The Berkshire block locked up on the bed of the Vandercook

Proofing each block is important because a letterpress press can pick up the odd raised cut mark so a little bit of remedial cutting was made on some of the blocks, Due to the large amount of black in these prints it was necessary to double ink each image.Which means running the inking rollers over the blocks once prior to the print run. After printing the tree book pages for 5 weeks my right arm must be getting stronger?

IMG_2124

The first rack of images..I am printing 30 of each for a book edition of 25 books. These plates will be trimmed by hand and then tipped in to the bound book.

Thomas finished the texts, then there was proofing and checking the texts again and again for spelling mistakes, spacings and incorrect letters. You think it is all OK and then you find another!

IMG_2130

Texts ready for proofreading.

By the end of Tuesday all the 300 plus plates were printed and we started on the book pages. We printed page 1 and page 24 first because these contain two small linocuts which will need to be dry before printing on the reverse.
Proofing the blocks,and printing the edition.

IMG_2138  .IMG_2146

Wednesday we started printing the texts!
Part Two tomorrow.